
In the United States, today is National Chocolate Covered Cherry Day. While one can certainly buy chocolate covered cherries in the store, homemade can be tasty and fun. The recipe below is one of many possible options.
Ingredients
- 40 maraschino cherries, with stems (about one 20-oz. jar)
- 1/4 cup butter (softened to room temperature)
- 1 Tbs light corn syrup
- 2 Tbs reserved cherry liquid (can substitute cherry liqueur)
- 1 tsp liquid invertase
- 3 cups powdered sugar (sifted)
- 1 lbs semi-sweet chocolate
- 1/2 tsp almond extract (optional)
Directions
- One day ahead, drain the cherries from their soaking liquid and reserve 2 Tbs of the liquid.
- Pat them dry between sheets of paper towel and let them sit on a wire rack overnight to dry.
- The next day, prepare the fondant filling. In the large bowl of a stand mixer, combine the butter, corn syrup, reserved cherry liquid, almond extract, and liquid invertase, and beat until combined. It is okay if the butter separates at this point—it will all come together soon.
- Stop the mixer and add the powdered sugar to the bowl, then mix on low speed until the candy comes together in a ball around the mixing paddle.
- Scrape the bottom of the bowl to make sure everything is incorporated, and check the texture of the candy: it should be quite soft, but not so sticky that you cannot handle it.
- If necessary, add a little more powdered sugar to make it workable, but remember: the softer it is to begin with, the sooner it will liquefy!
- Use a small candy scoop or a teaspoon to form a quarter-sized ball of fondant, and roll it in your hands to get it round. Flatten the ball between your palms, and place a cherry in the center of the fondant.
- Bring together the outer edges and pinch the fondant together at the top where the stem extends from the cherry. Make sure the cherry is covered completely, then roll it between your palms to smooth out any seams or wrinkles and get it round.
- Place the cherry on a waxed paper-covered baking sheet, then repeat with the remaining cherries until they are all covered with fondant. If you are confused about this process, refer to the chocolate-covered cherries photo tutorial.
- Because the fondant is fairly soft, it needs to be refrigerated before you can dip the cherries. Refrigerate the tray until the fondant feels firm, at least 30 minutes.
- While you are waiting for the fondant to firm up, temper the chocolate, and prepare a place in your kitchen to dip the cherries. If you do not want to temper the chocolate, it’s recommended to use chocolate candy coating instead of real chocolate that is not tempered. Untempered chocolate gets soft at room temperature and is not the good choice for this candy.
- When the fondant is firm, begin the dipping process. We’ll first dip just the bottoms of the cherries to help prevent leaks later on. Holding a cherry by the stem, dip just the bottom in the chocolate, coming about 1/4-inch up the sides of the cherry. Place the cherry back on the baking sheet and repeat with the remaining cherries. When the center liquefies, it will leak out of any weak spots in the chocolate coating, and the bottom of a dipped candy is a notoriously weak spot. Double-dipping the bottom ensures a strong coating and reduces the possibility of leaky chocolate cherries.
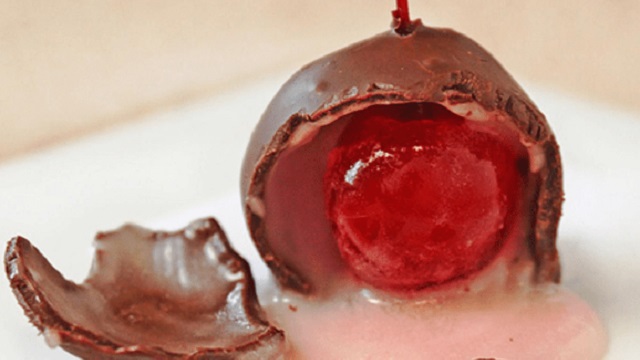
- By the time you have finished dipping the bottom of the last cherry, the first cherry is probably set and ready to be fully dipped. (If not, refrigerate the tray briefly to set the chocolate bottoms.) Hold a cherry by the stem and drag it through the chocolate, coating it completely. Be sure that there is absolutely no fondant showing through anywhere. It’s better to coat a little of the stem with chocolate, as well, just to be sure liquid fondant doesn’t bubble through the top where the stem extends from the chocolate. When it is fully covered with chocolate, let the excess drip over the bowl, then gently drag the bottom edge over the lip of the bowl to remove any excess. Replace the cherry on the baking sheet and repeat until all of the cherries are covered with chocolate.
While the cherries can be enjoyed as soon as the chocolate is hard, to get liquid centers you will have to wait anywhere from a few days to a few weeks.
Store the cherries at warm room temperature during this time—cold temperatures will slow the working of the invertase. You can start testing the cherries after 2-3 days and continue to monitor their progress via the occasional taste test until the centers are completely liquid. Enjoy!